HADOOP安装配置
1 | ~ tar -zxvf hadoop-x.y.z.tar.gz |
伪分布模式
http://hadoop.apache.org/docs/current/hadoop-project-dist/hadoop-common/SingleCluster.html
- 需要开启ssh,macos上:系统偏好设置 > 共享 > 远程登录
1 | ~ ssh-keygen -t rsa -P '' -f ~/.ssh/id_rsa |
将etc/hadoop/目录下的配置文件copy到一个专门的地方,将配置和安装文件隔离
上面的$HADOOP_CONF_DIR修改配置
etc/hadoop/core-site.xml:
1 | <configuration> |
etc/hadoop/hdfs-site.xml:
1 | <configuration> |
etc/hadoop/mapred-site.xml:
1 | <configuration> |
etc/hadoop/yarn-site.xml:
1 | <configuration> |
- 格式化文件系统
1 | ~ bin/hdfs namenode -format |
- 启动
1 | ~ sbin/start-dfs.sh |
HDFS
数据流
一致模型(文件读写的数据可见性)
- 新建一个文件,它能在文件系统中立即可见
- 写入文件不能保证立即可见,即使调用了flush刷新并存储
- 当写入的数据超过一个块后,第一个数据块对新的reader才可见,总之,当前正在写入的块对其他reader不可见
- hflush,可以将所有缓存强制刷新到datanode,hflush返回成功后,新的reader都能读到目前为止写入的数据,但是这个实际上也仅确保数据在datanode的内存中,所以如果断电会造成数据丢失
- hsync,类似于fsync,确保数据写入到磁盘
distcp——并行复制
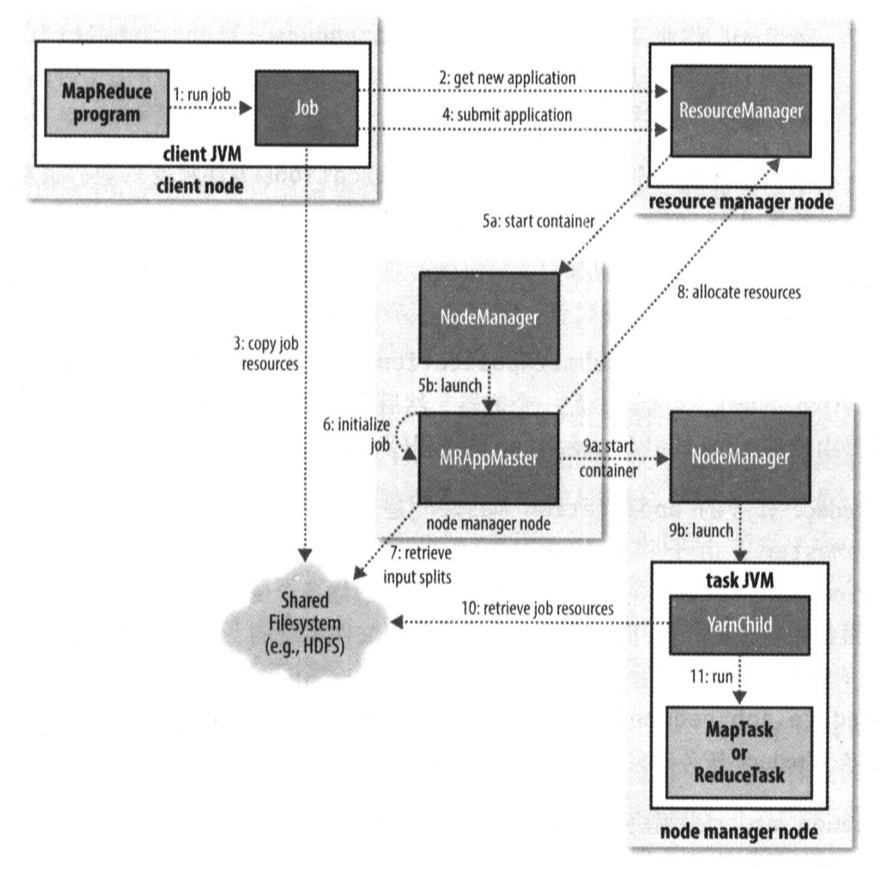
MapReduce作业运行机制
作业的提交
HIVE
HIVE安装配置
- 包解压和环境变量配置
http://hive.apache.org/downloads.html
20191006:Hive 3.1.2版本下载下来有点问题,guava的jar包版本有问题(19.0),需要手动替换成28.1-jre
1 | export HIVE_HOME=/Users/xxx/usr/apache-hive |
- mysql启动,没有mysql则需要安装,配置用户&数据库
- 配置apache-hive/conf/hive-site.xml
1 |
|
- 格式化数据库
1 | apache-hive/bin/schematool -dbType mysql -initSchema |
- 连接hive
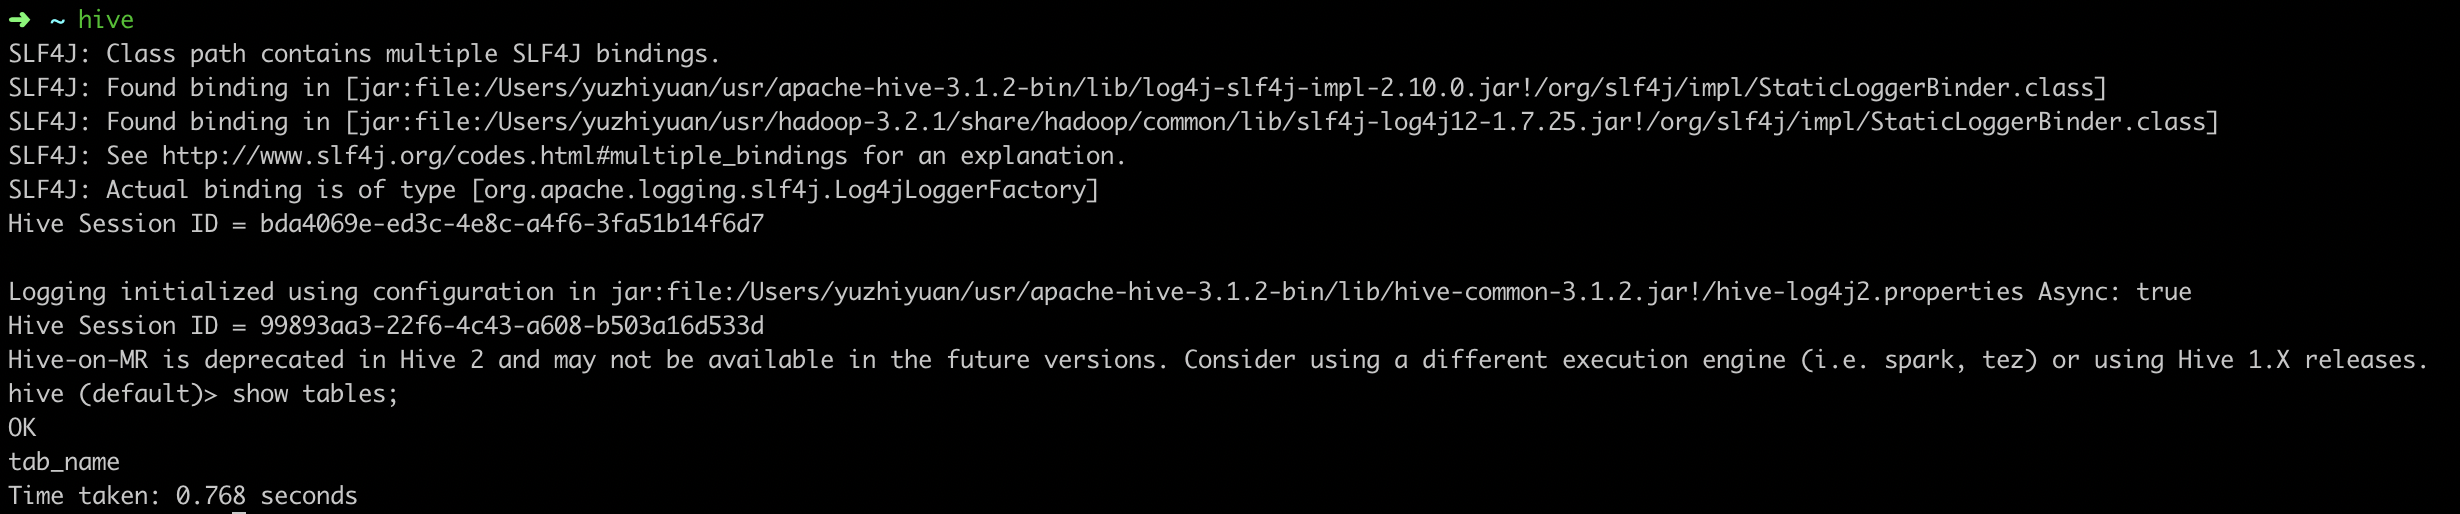
- 简单命令
1 | hive -f scripts.q |
HIVE示例
- 建表
字段之间的分隔符是制表符
1 | create table records (year string,temperature int ,quality int) row format delimited fields terminated by '\t'; |
- 在hdfs创建目录
1 | hadoop fs -mkdir -p /user/hive/warehouse/records |
- 加载数据
1 | load data local inpath '/Users/yuzhiyuan/workspace/code/test/hive/sample.txt' overwrite into table records; |
HiveQL
- 内置函数
1 | show functions; |
- 类型转换
- 任何数值类型都可以隐式转换成一个范围更广的类型或者文本类型(string/char/varchar)
- 所有文本类型可以隐式的转换成另一种文本类型
- 文本类型可以隐式的转换成double/decimal
- boolean类型不能转换
- timestamp和date可以隐式转换为文本类型
表
托管表和外部表
托管表的删除,会把元数据和数据一起删掉
1 | create table managed_table (dummy string); |
外部表的删除,只会删除元数据1
2
3
4create external table managed_table (dummy string);
load data inpath '/user/tom/sample.txt' into table managed_table;
删除表
drop table managed_table;
分区和桶
分区相当于表目录下的子目录,在partitioned by中定义的是分区列,数据列中并不包含,因为它们源于目录名
1 | create table logs (ts bigint, line string) partitioned by (dt string, country string); |
- 查看表所具有的分区
1 | hive> show partitions logs; |
桶
1 | create table bucketed_users (id bigint, name string) |
导入数据
1 | insert overwrite table target |
多表插入
遍历一次源表,产生多份数据,提高效率
1 | FROM records2 |
查询数据
排序和聚集
- order by
全排序 - sort by
hive的非标准扩展,为每个reducer排序 - distribute by
控制特定行到哪个reducer
1 | select year,temperature from record distribute by year sort by year asc, temperature desc; |
当
distribute by和sort by中所用的列相同时,可以简写为cluster by
MapReduce脚本
transform 脚本,从stdin获取输入,并以tab分隔打印到标准输出
1
2
3
4
5
6
7
8import sys
import datetime
for line in sys.stdin:
line = line.strip()
userid, movieid, rating, unixtime = line.split('\t')
weekday = datetime.datetime.fromtimestamp(float(unixtime)).isoweekday()
print '\t'.join([userid, movieid, rating, str(weekday)])HiveQL,
transform (*) using '*.py' as (*)1
2
3
4
5
6
7
8
9
10
11
12
13
14
15
16
17
18
19
20CREATE TABLE u_data_new (
userid INT,
movieid INT,
rating INT,
weekday INT)
ROW FORMAT DELIMITED
FIELDS TERMINATED BY '\t';
add FILE weekday_mapper.py;
INSERT OVERWRITE TABLE u_data_new
SELECT
TRANSFORM (userid, movieid, rating, unixtime)
USING 'python weekday_mapper.py'
AS (userid, movieid, rating, weekday)
FROM u_data;
SELECT weekday, COUNT(*)
FROM u_data_new
GROUP BY weekday;
连接
join & outer join & left join & right join
1 | hive> INSERT OVERWRITE TABLE events SELECT t1.bar, t1.foo, t2.foo FROM pokes t1 JOIN invites t2 ON (t1.bar = t2.bar); |